Introduction
If you are installing Linux on your IBM Power System's S822LC server then the instructions in this article will help you to start and run your system. These instructions are specific to installing CentOS 7 on an IBM Power System S822LC for High Performance Computing (Minsky), but also work for RHEL 7 - just swap CentOS for RHEL.
Prerequisites
Before you power on the system, ensure that you have the following items:
- Ethernet cables;
- USB storage device of 7G or greater;
- An installed ethernet network with a DHCP server;
- Access to the DHCP server's logs;
- Power cords and outlet for your system;
- PC or notebook that has IPMItool level 1.8.15 or greater; and
- a VNC client.
Download CentOS ISO file from the Centos Mirror. Select the "Everything" ISO file.
Note: You must use the 1611 release (dated 2016-12-22) or later due to Linux Kernel support for the server hardware.
Step 1: Preparing to power on your system
Follow these steps to prepare your system:
- If your system belongs in a rack, install your system into that rack. For instructions, see IBM POWER8 Systems information.
- Connect an Ethernet cable to the left embedded Ethernet port next to the serial port on the back of your system and the other end to your network. This Ethernet port is used for the BMC/IPMI interface.
- Connect another Enternet cable to the right Ethernet port for network connection for the operating system.
- Connect the power cords to the system and plug them into the outlets.
At this point, your firmware is booting.
Step 2: Determining the BMC firmware IP address
To determine the IP address of the BMC, examine the latest DHCP server logs for the network connected to the server. The IP address will be requested approximately 2 minutes after being powered on.
It is possible to set the BMC to a static IP address by following the IBM documentation on IPMI.
Step 3: Connecting to the BMC firmware with IPMItool
After you have a network connection set up for your BMC firmware, you can connect using Intelligent Platform Management Interface (IPMI). IPMI is the default console to use when connecting to the Open Power Abstraction Layer (OPAL) firmware.
Use the default authentication for servers over IPMI is:
- Default user: ADMIN
- Default password: admin
To power on your server from a PC or notebook that is running Linux®, follow these steps:
Open a terminal program on your PC or notebook with Activate Serial-Over-Lan using IPMI. Use other steps here as needed.
For the following impitool commands, server_ip_address is the IP address of the BMC from Step 2, and ipmi_user and ipmi_password are the default user ID and password for IPMI.
Power On using IPMI
If your server is not powered on, run the following command to power the server on:
ipmitool -I lanplus -H server_ip_address -U ipmi_user -P ipmi_password chassis power on
Activate Serial-Over-Lan using IPMI
Activate your IPMI console by running this command:
ipmitool -I lanplus -H server_ip_address -U ipmi_user -P ipmi_password sol activate
After powering on your system, the Petitboot interface loads. If you do not interrupt the boot process by pressing any key within 10 seconds, Petitboot automatically boots the first option. At this point the IPMI console will be connected to the Operating Systems serial. If you get to this stage accidently you can deactivate and reboot as per the following two commands.
Deactivate Serial-Over-Lan using IPMI
If you need to power off or reboot your system, deactivate the console by running this command:
ipmitool -I lanplus -H server_ip_address -U user-name -P ipmi_password sol deactivate
Reboot using IPMI
If you need to reboot the system, run this command:
ipmitool -I lanplus -H server_ip_address -U user-name -P ipmi_password chassis power reset
Step 4: Creating a USB device and booting
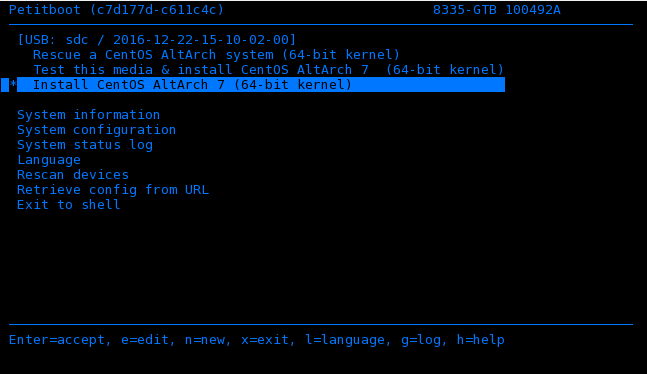
At this point, your IPMI console should be contain a Petitboot bootloader menu as illustrated below and you are ready to install Centos 7 on your server.
Use one of the following USB devices:
- USB attached DVD player with a single USB cable to stay under 1.0 Amps, or
- 7 GB (or more) 2.0 (or later) USB flash drive.
Follow the following instructions:
- To create the bootable USB device, follow the instructions in the CentOS wiki Host to Set Up a USB to Install CentOS.
- Insert your bootable USB device into the front USB port. CentOS AltArch installer will automatically appear as a boot option on the Petitboot main screen. If the USB device does not appear select Rescan devices. If your device is not detected, you might have to try a different type.
- Arrow up to select the CentOS boot option. Press e (Edit) to open the Petitboot Option Editor window
- Move the cursor to the Boot arguments section and to include the following information:
ro inst.stage2=hd:LABEL=CentOS_7_ppc64le:/ console=hvc0 ip=dhcp(if using RHEL the LABEL will be similar toRHEL-7.3\x20Server.ppc64le:/)
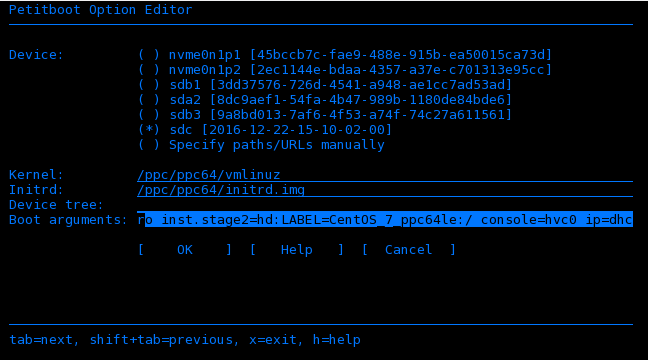
Notes about the boot arguments:
ip=dhcpto ensure network is started for VNC installation.console hvc0is needed as this is not the default.inst.stage2is needed as the boot process won't automatically find the stage2 install on the install disk.- append
inst.proxy=URLwhere URL is the proxy URL if installing in a network that requires a proxy to connect externally.
You can find additional options at Anaconda Boot Options.
- Select OK to save your options and return to the Main menu
- On the Petitboot main screen, select the CentOS AltArch option and then press Enter.
Step 5: Complete your installation
After you select to boot the CentOS installer, the installer wizard walks you through the steps.
- If the CentOS installer was able to obtain a network address via DHCP, it will present an option to enable the VNC. If no option is presented check your network cables.
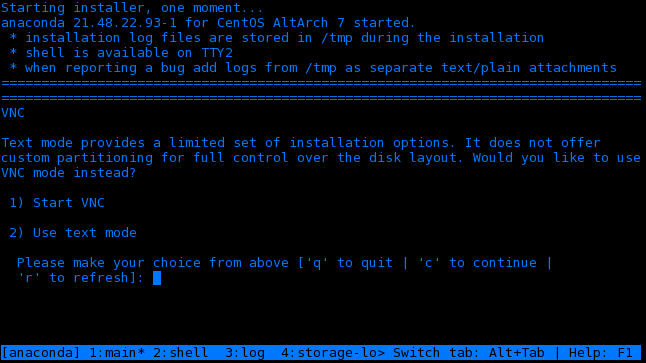
- Select the Start VNC option and it will provide an OS server IP adress. Note that this will be different to the BMC address previously optained.
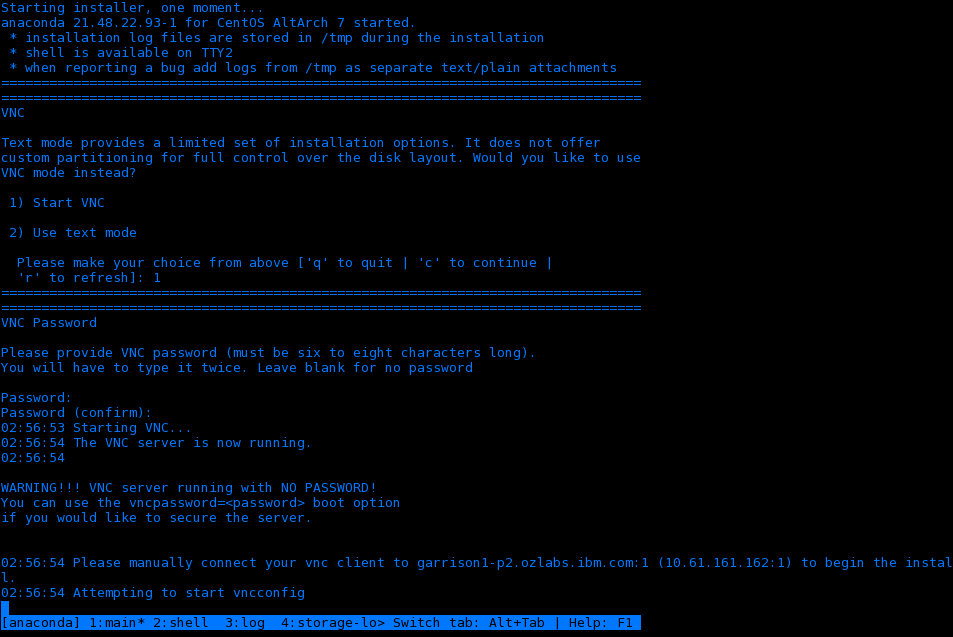
- Run a VNC client program on your PC or notebook and connect to the OS server IP address.
During the install over VNC, there are a couple of consoles active. To switch between them in the ipmitool terminal, press ctrl-b and then between 1-4 as indicated.
Using the VNC client program:
- Select "Install Destination"
- Select a device from "Local Standard Disks"
- Select "Full disk summary and boot device"
- Select the device again from "Selected Disks" with the Boot enabled
- Select "Do not install boot loader" from device.
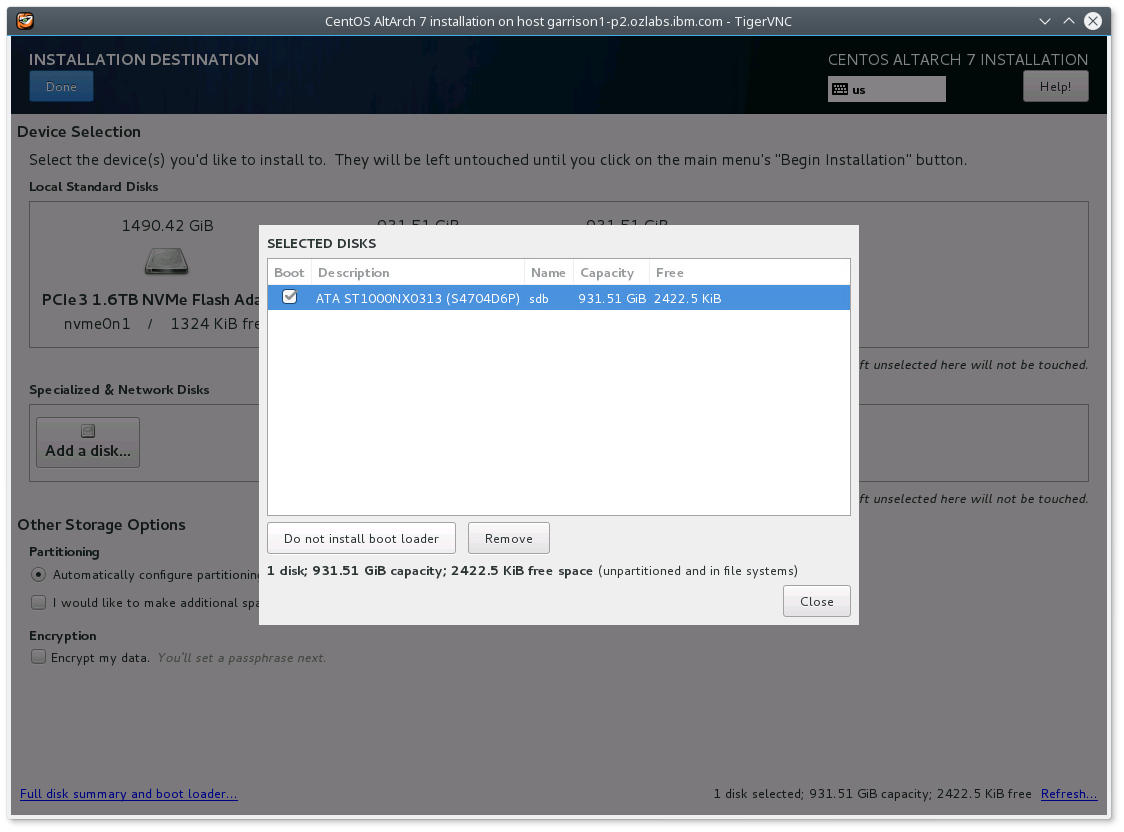 which results in
 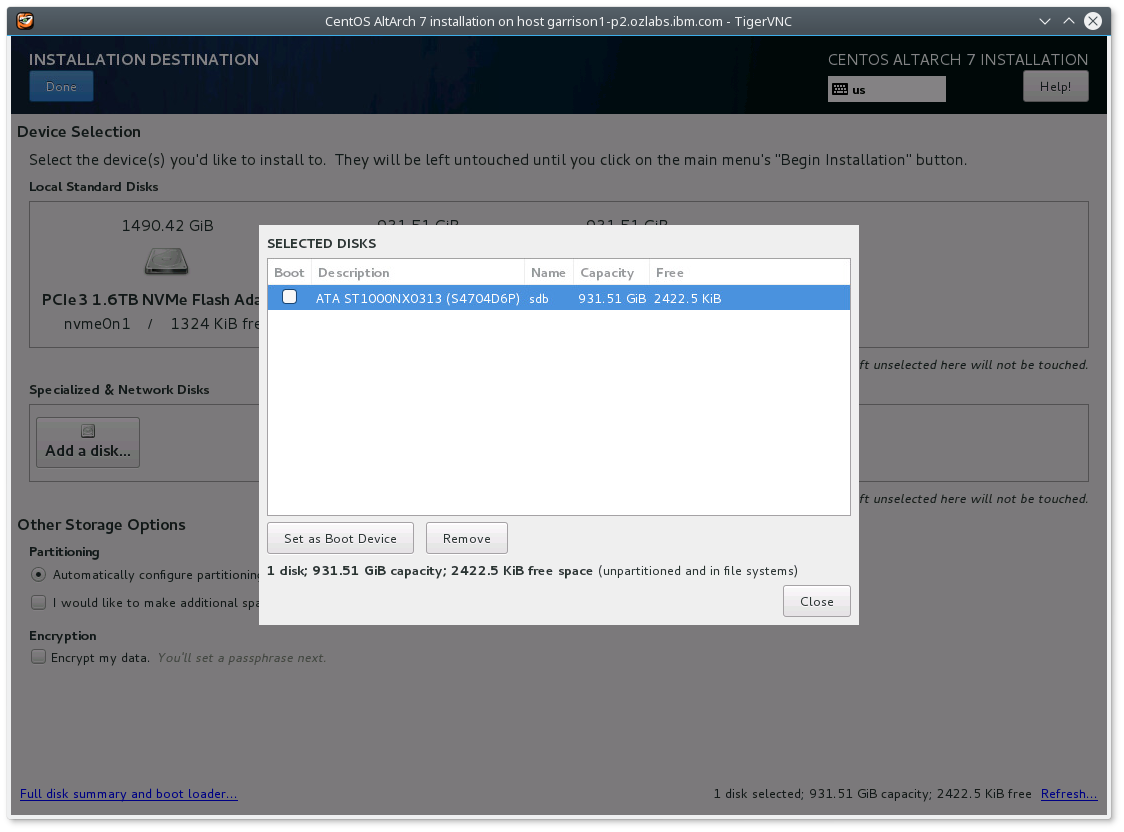 .
.
Without disabling boot loader, the installer complains about an invalid stage1 device. I suspect it needs a manual Prep partition of 10M to make the installer happy.
If you have a local Centos repository you can set this by selecting "Install Source" - the directories at this url should look like CentOS's Install Source for ppc64le.
Step 6: Before reboot and using the IPMI Serial-Over-LAN
Before reboot, generate the grub.cfg file as Petitboot uses this to generate its boot menu:
- Using the ipmitool's shell (ctrl-b 2):
- Enter the following commands to generate a grub.cfg file
chroot /mnt/sysimage
rm /etc/grub.d/30_os-prober
grub2-mkconfig -o /boot/grub2/grub.cfg
exit
/etc/grub.d/30_os-prober is removed as Petitboot probes the other devices anyway so including it would create lots of duplicate menu items.
The last step is to restart your system.
Note: While your system is restarting, remove the USB device.
After the system restarts, Petitboot displays the option to boot CentOS 7.2. Select this option and press Enter.
Conclusion
After you have booted CentOS, your server is ready to go! For more information, see the following resources: