Store Halfword Byte-Reverse Indexed

A Power Technical Blog

OpenPOWER Summit Europe 2018: A Software Developer's Introduction to OpenCAPI

Last month, I was in Amsterdam at OpenPOWER Summit Europe. It was great to see so much interest in OpenPOWER, with a particularly strong contingent of researchers sharing how they're exploiting the unique advantages of OpenPOWER platforms, and a number of OpenPOWER hardware partners announcing products.

(It was also my first time visiting Europe, so I had a lot of fun exploring Amsterdam, taking a few days off in Vienna, then meeting some of my IBM Linux Technology Centre colleagues in Toulouse. I also now appreciate just what ~50 hours on planes does to you!)

One particular area which got a lot of attention at the Summit was OpenCAPI, an open coherent high-performance bus interface designed for accelerators, which is supported on POWER9. We had plenty of talks about OpenCAPI and the interesting work that is already happening with OpenCAPI accelerators.

I was invited to present on the Linux Technology Centre's work on enabling OpenCAPI from the software side. In this talk, I outline the OpenCAPI software stack and how you can interface with an OpenCAPI device through the ocxl kernel driver and the libocxl userspace library.

My slides are available, though you'll want to watch the presentation for context.

Apart from myself, the OzLabs team were well represented at the Summit:

Unfortunately none of their videos are up yet, but they'll be there over the next few weeks. Keep an eye on the Summit website and the Summit YouTube playlist, where you'll find all the rest of the Summit content.

If you've got any questions about OpenCAPI feel free to leave a comment!

Open Source Firmware Conference 2018

I recently had the pleasure of attending the 2018 Open Source Firmware Conference in Erlangen, Germany. Compared to other more general conferences I've attended in the past, the laser focus of OSFC on firmware and especially firmware security was fascinating. Seeing developers from across the world coming together to discuss how they are improving their corner of the stack was great, and I've walked away with plenty of new knowledge and ideas (and several kilos of German food and drink..).


What was especially exciting though is that I had the chance to talk about my work on Petitboot and what's happened from the POWER8 launch until now. If you're interested in that, or seeing how I talk after 36 hours of travel, check it out here:


OSFC have made all the talks from the first two days available in a playlist on Youtube
If you're after a few suggestions there was, in no particular order:

Ryan O'Leary giving an update on Linuxboot - also known as NERF, Google's approach to a Linux bootloader all written in Go.

Subrate Banik talking about porting Coreboot on top of Intel's FSP

Ron Minnich describing his work with "rompayloads" on Coreboot

Vadmin Bendebury describing Google's "Secure Microcontroller" Chip

Facebook presenting their use of Linuxboot and "systemboot"

And heaps more, check out the full playlist!

Improving performance of Phoronix benchmarks on POWER9

Recently Phoronix ran a range of benchmarks comparing the performance of our POWER9 processor against the Intel Xeon and AMD EPYC processors.

We did well in the Stockfish, LLVM Compilation, Zstd compression, and the Tinymembench benchmarks. A few of my colleagues did a bit of investigating into some the benchmarks where we didn't perform quite so well.

LBM / Parboil

The Parboil benchmarks are a collection of programs from various scientific and commercial fields that are useful for examining the performance and development of different architectures and tools. In this round of benchmarks Phoronix used the lbm benchmark: a fluid dynamics simulation using the Lattice-Boltzmann Method.

lbm is an iterative algorithm - the problem is broken down into discrete time steps, and at each time step a bunch of calculations are done to simulate the change in the system. Each time step relies on the results of the previous one.

The benchmark uses OpenMP to parallelise the workload, spreading the calculations done in each time step across many CPUs. The number of calculations scales with the resolution of the simulation.

Unfortunately, the resolution (and therefore the work done in each time step) is too small for modern CPUs with large numbers of SMT (simultaneous multi-threading) threads. OpenMP doesn't have enough work to parallelise and the system stays relatively idle. This means the benchmark scales relatively poorly, and is definitely not making use of the large POWER9 system

Also this benchmark is compiled without any optimisation. Recompiling with -O3 improves the results 3.2x on POWER9.

x264 Video Encoding

x264 is a library that encodes videos into the H.264/MPEG-4 format. x264 encoding requires a lot of integer kernels doing operations on image elements. The math and vectorisation optimisations are quite complex, so Nick only had a quick look at the basics. The systems and environments (e.g. gcc version 8.1 for Skylake, 8.0 for POWER9) are not completely apples to apples so for now patterns are more important than the absolute results. Interestingly the output video files between architectures are not the same, particularly with different asm routines and compiler options used, which makes it difficult to verify the correctness of any changes.

All tests were run single threaded to avoid any SMT effects.

With the default upstream build of x264, Skylake is significantly faster than POWER9 on this benchmark (Skylake: 9.20 fps, POWER9: 3.39 fps). POWER9 contains some vectorised routines, so an initial suspicion is that Skylake's larger vector size may be responsible for its higher throughput.

Let's test our vector size suspicion by restricting Skylake to SSE4.2 code (with 128 bit vectors, the same width as POWER9). This hardly slows down the x86 CPU at all (Skylake: 8.37 fps, POWER9: 3.39 fps), which indicates it's not taking much advantage of the larger vectors.

So the next guess would be that x86 just has more and better optimized versions of costly functions (in the version of x264 that Phoronix used there are only six powerpc specific files compared with 21 x86 specific files). Without the time or expertise to dig into the complex task of writing vector code, we'll see if the compiler can help, and turn on autovectorisation (x264 compiles with -fno-tree-vectorize by default, which disables auto vectorization). Looking at a perf profile of the benchmark we can see that one costly function, quant_4x4x4, is not autovectorised. With a small change to the code, gcc does vectorise it, giving a slight speedup with the output file checksum unchanged (Skylake: 9.20 fps, POWER9: 3.83 fps).

We got a small improvement with the compiler, but it looks like we may have gains left on the table with our vector code. If you're interested in looking into this, we do have some active bounties for x264 (lu-zero/x264).

Test Skylake POWER9
Original - AVX256 9.20 fps 3.39 fps
Original - SSE4.2 8.37 fps 3.39 fps
Autovectorisation enabled, quant_4x4x4 vectorised 9.20 fps 3.83 fps

Nick also investigated running this benchmark with SMT enabled and across multiple cores, and it looks like the code is not scalable enough to feed 176 threads on a 44 core system. Disabling SMT in parallel runs actually helped, but there was still idle time. That may be another thing to look at, although it may not be such a problem for smaller systems.

Primesieve

Primesieve is a program and C/C++ library that generates all the prime numbers below a given number. It uses an optimised Sieve of Eratosthenes implementation.

The algorithm uses the L1 cache size as the sieve size for the core loop. This is an issue when we are running in SMT mode (aka more than one thread per core) as all threads on a core share the same L1 cache and so will constantly be invalidating each others cache-lines. As you can see in the table below, running the benchmark in single threaded mode is 30% faster than in SMT4 mode!

This means in SMT-4 mode the workload is about 4x too large for the L1 cache. A better sieve size to use would be the L1 cache size / number of threads per core. Anton posted a pull request to update the sieve size.

It is interesting that the best overall performance on POWER9 is with the patch applied and in SMT2 mode:

SMT level baseline patched
1 14.728s 14.899s
2 15.362s 14.040s
4 19.489s 17.458s

LAME

Despite its name, a recursive acronym for "LAME Ain't an MP3 Encoder", LAME is indeed an MP3 encoder.

Due to configure options not being parsed correctly this benchmark is built without any optimisation regardless of architecture. We see a massive speedup by turning optimisations on, and a further 6-8% speedup by enabling USE_FAST_LOG (which is already enabled for Intel).

LAME Duration Speedup
Default 82.1s n/a
With optimisation flags 16.3s 5.0x
With optimisation flags and USE_FAST_LOG set 15.6s 5.3x

For more detail see Joel's writeup.

FLAC

FLAC is an alternative encoding format to MP3. But unlike MP3 encoding it is lossless! The benchmark here was encoding audio files into the FLAC format.

The key part of this workload is missing vector support for POWER8 and POWER9. Anton and Amitay submitted this patch series that adds in POWER specific vector instructions. It also fixes the configuration options to correctly detect the POWER8 and POWER9 platforms. With this patch series we get see about a 3x improvement in this benchmark.

OpenSSL

OpenSSL is among other things a cryptographic library. The Phoronix benchmark measures the number of RSA 4096 signs per second:

$ openssl speed -multi $(nproc) rsa4096

Phoronix used OpenSSL-1.1.0f, which is almost half as slow for this benchmark (on POWER9) than mainline OpenSSL. Mainline OpenSSL has some powerpc multiplication and squaring assembly code which seems to be responsible for most of this speedup.

To see this for yourself, add these four powerpc specific commits on top of OpenSSL-1.1.0f:

  1. perlasm/ppc-xlate.pl: recognize .type directive
  2. bn/asm/ppc-mont.pl: prepare for extension
  3. bn/asm/ppc-mont.pl: add optimized multiplication and squaring subroutines
  4. ppccap.c: engage new multipplication and squaring subroutines

The following results were from a dual 16-core POWER9:

Version of OpenSSL Signs/s Speedup
1.1.0f 1921 n/a
1.1.0f with 4 patches 3353 1.74x
1.1.1-pre1 3383 1.76x

SciKit-Learn

SciKit-Learn is a bunch of python tools for data mining and analysis (aka machine learning).

Joel noticed that the benchmark spent 92% of the time in libblas. Libblas is a very basic BLAS (basic linear algebra subprograms) library that python-numpy uses to do vector and matrix operations. The default libblas on Ubuntu is only compiled with -O2. Compiling with -Ofast and using alternative BLAS's that have powerpc optimisations (such as libatlas or libopenblas) we see big improvements in this benchmark:

BLAS used Duration Speedup
libblas -O2 64.2s n/a
libblas -Ofast 36.1s 1.8x
libatlas 8.3s 7.7x
libopenblas 4.2s 15.3x

You can read more details about this here.

Blender

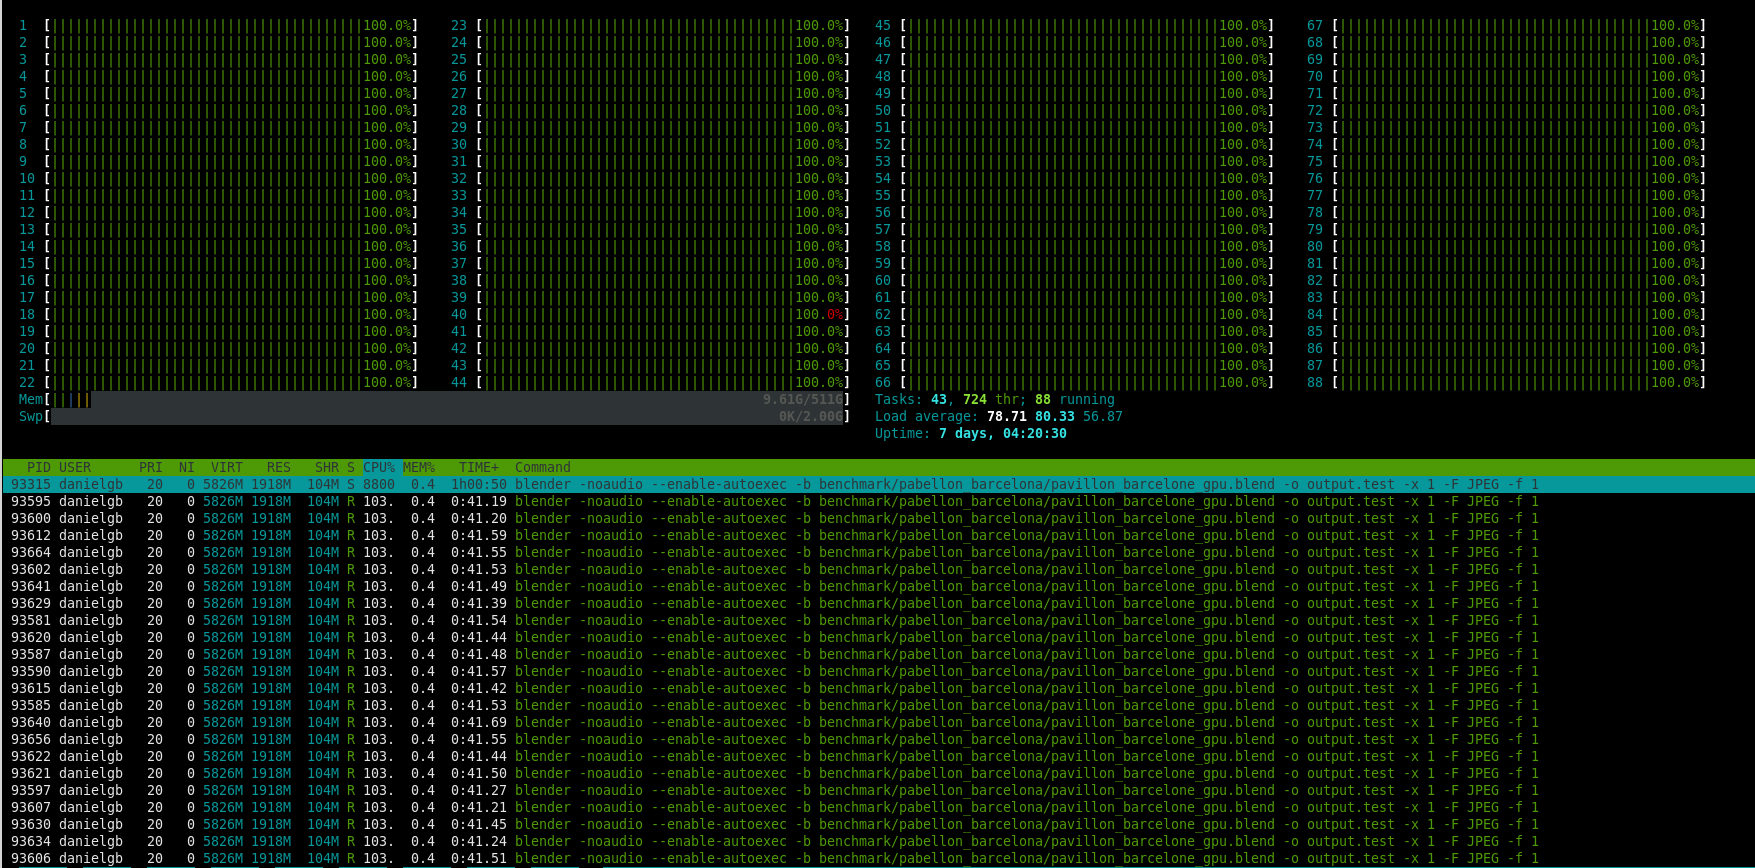
Blender is a 3D graphics suite that supports image rendering, animation, simulation and game creation. On the surface it appears that Blender 2.79b (the distro package version that Phoronix used by system/blender-1.0.2) failed to use more than 15 threads, even when "-t 128" was added to the Blender command line.

It turns out that even though this benchmark was supposed to be run on CPUs only (you can choose to render on CPUs or GPUs), the GPU file was always being used. The GPU file is configured with a very large tile size (256x256) - which is fine for GPUs but not great for CPUs. The image size (1280x720) to tile size ratio limits the number of jobs created and therefore the number threads used.

To obtain a realistic CPU measurement with more that 15 threads you can force the use of the CPU file by overwriting the GPU file with the CPU one:

$ cp
~/.phoronix-test-suite/installed-tests/system/blender-1.0.2/benchmark/pabellon_barcelona/pavillon_barcelone_cpu.blend
~/.phoronix-test-suite/installed-tests/system/blender-1.0.2/benchmark/pabellon_barcelona/pavillon_barcelone_gpu.blend

As you can see in the image below, now all of the cores are being utilised! Blender with CPU Blend file

Fortunately this has already been fixed in pts/blender-1.1.1. Thanks to the report by Daniel it has also been fixed in system/blender-1.1.0.

Pinning the pts/bender-1.0.2, Pabellon Barcelona, CPU-Only test to a single 22-core POWER9 chip (sudo ppc64_cpu --cores-on=22) and two POWER9 chips (sudo ppc64_cpu --cores-on=44) show a huge speedup:

Benchmark Duration (deviation over 3 runs) Speedup
Baseline (GPU blend file) 1509.97s (0.30%) n/a
Single 22-core POWER9 chip (CPU blend file) 458.64s (0.19%) 3.29x
Two 22-core POWER9 chips (CPU blend file) 241.33s (0.25%) 6.25x

tl;dr

Some of the benchmarks where we don't perform as well as Intel are where the benchmark has inline assembly for x86 but uses generic C compiler generated assembly for POWER9. We could probably benefit with some more powerpc optimsed functions.

We also found a couple of things that should result in better performance for all three architectures, not just POWER.

A summary of the performance improvements we found:

Benchmark Approximate Improvement
Parboil 3x
x264 1.1x
Primesieve 1.1x
LAME 5x
FLAC 3x
OpenSSL 2x
SciKit-Learn 7-15x
Blender 3x

There is obviously room for more improvements, especially with the Primesieve and x264 benchmarks, but it would be interesting to see a re-run of the Phoronix benchmarks with these changes.

Thanks to Anton, Daniel, Joel and Nick for the analysis of the above benchmarks.

Stupid Solutions to Stupid Problems: Hardcoding Your SSH Key in the Kernel

The "problem"

I'm currently working on firmware and kernel support for OpenCAPI on POWER9.

I've recently been allocated a machine in the lab for development purposes. We use an internal IBM tool running on a secondary machine that triggers hardware initialisation procedures, then loads a specified skiboot firmware image, a kernel image, and a root file system directly into RAM. This allows us to get skiboot and Linux running without requiring the usual hostboot initialisation and gives us a lot of options for easier tinkering, so it's super-useful for our developers working on bringup.

When I got access to my machine, I figured out the necessary scripts, developed a workflow, and started fixing my code... so far, so good.

One day, I was trying to debug something and get logs off the machine using ssh and scp, when I got frustrated with having to repeatedly type in our ultra-secret, ultra-secure root password, abc123. So, I ran ssh-copy-id to copy over my public key, and all was good.

Until I rebooted the machine, when strangely, my key stopped working. It took me longer than it should have to realise that this is an obvious consequence of running entirely from an initrd that's reloaded every boot...

The "solution"

I mentioned something about this to Jono, my housemate/partner-in-stupid-ideas, one evening a few weeks ago. We decided that clearly, the best way to solve this problem was to hardcode my SSH public key in the kernel.

This would definitely be the easiest and most sensible way to solve the problem, as opposed to, say, just keeping my own copy of the root filesystem image. Or asking Mikey, whose desk is three metres away from mine, whether he could use his write access to add my key to the image. Or just writing a wrapper around sshpass...

One Tuesday afternoon, I was feeling bored...

The approach

The SSH daemon looks for authorised public keys in ~/.ssh/authorized_keys, so we need to have a read of /root/.ssh/authorized_keys return a specified hard-coded string.

I did a bit of investigation. My first thought was to put some kind of hook inside whatever filesystem driver was being used for the root. After some digging, I found out that the filesystem type rootfs, as seen in mount, is actually backed by the tmpfs filesystem. I took a look around the tmpfs code for a while, but didn't see any way to hook in a fake file without a lot of effort - the tmpfs code wasn't exactly designed with this in mind.

I thought about it some more - what would be the easiest way to create a file such that it just returns a string?

Then I remembered sysfs, the filesystem normally mounted at /sys, which is used by various kernel subsystems to expose configuration and debugging information to userspace in the form of files. The sysfs API allows you to define a file and specify callbacks to handle reads and writes to the file.

That got me thinking - could I create a file in /sys, and then use a bind mount to have that file appear where I need it in /root/.ssh/authorized_keys? This approach seemed fairly straightforward, so I decided to give it a try.

First up, creating a pseudo-file. It had been a while since the last time I'd used the sysfs API...

sysfs

The sysfs pseudo file system was first introduced in Linux 2.6, and is generally used for exposing system and device information.

Per the sysfs documentation, sysfs is tied in very closely with the kobject infrastructure. sysfs exposes kobjects as directories, containing "attributes" represented as files. The kobject infrastructure provides a way to define kobjects representing entities (e.g. devices) and ksets which define collections of kobjects (e.g. devices of a particular type).

Using kobjects you can do lots of fancy things such as sending events to userspace when devices are hotplugged - but that's all out of the scope of this post. It turns out there's some fairly straightforward wrapper functions if all you want to do is create a kobject just to have a simple directory in sysfs.

#include <linux/kobject.h>

static int __init ssh_key_init(void)
{
        struct kobject *ssh_kobj;
        ssh_kobj = kobject_create_and_add("ssh", NULL);
        if (!ssh_kobj) {
                pr_err("SSH: kobject creation failed!\n");
                return -ENOMEM;
        }
}
late_initcall(ssh_key_init);

This creates and adds a kobject called ssh. And just like that, we've got a directory in /sys/ssh/!

The next thing we have to do is define a sysfs attribute for our authorized_keys file. sysfs provides a framework for subsystems to define their own custom types of attributes with their own metadata - but for our purposes, we'll use the generic bin_attribute attribute type.

#include <linux/sysfs.h>

const char key[] = "PUBLIC KEY HERE...";

static ssize_t show_key(struct file *file, struct kobject *kobj,
                        struct bin_attribute *bin_attr, char *to,
                        loff_t pos, size_t count)
{
        return memory_read_from_buffer(to, count, &pos, key, bin_attr->size);
}

static const struct bin_attribute authorized_keys_attr = {
        .attr = { .name = "authorized_keys", .mode = 0444 },
        .read = show_key,
        .size = sizeof(key)
};

We provide a simple callback, show_key(), that copies the key string into the file's buffer, and we put it in a bin_attribute with the appropriate name, size and permissions.

To actually add the attribute, we put the following in ssh_key_init():

int rc;
rc = sysfs_create_bin_file(ssh_kobj, &authorized_keys_attr);
if (rc) {
        pr_err("SSH: sysfs creation failed, rc %d\n", rc);
        return rc;
}

Woo, we've now got /sys/ssh/authorized_keys! Time to move on to the bind mount.

Mounting

Now that we've got a directory with the key file in it, it's time to figure out the bind mount.

Because I had no idea how any of the file system code works, I started off by running strace on mount --bind ~/tmp1 ~/tmp2 just to see how the userspace mount tool uses the mount syscall to request the bind mount.

execve("/bin/mount", ["mount", "--bind", "/home/ajd/tmp1", "/home/ajd/tmp2"], [/* 18 vars */]) = 0

...

mount("/home/ajd/tmp1", "/home/ajd/tmp2", 0x18b78bf00, MS_MGC_VAL|MS_BIND, NULL) = 0

The first and second arguments are the source and target paths respectively. The third argument, looking at the signature of the mount syscall, is a pointer to a string with the file system type. Because this is a bind mount, the type is irrelevant (upon further digging, it turns out that this particular pointer is to the string "none").

The fourth argument is where we specify the flags bitfield. MS_MGC_VAL is a magic value that was required before Linux 2.4 and can now be safely ignored. MS_BIND, as you can probably guess, signals that we want a bind mount.

(The final argument is used to pass file system specific data - as you can see it's ignored here.)

Now, how is the syscall actually handled on the kernel side? The answer is found in fs/namespace.c.

SYSCALL_DEFINE5(mount, char __user *, dev_name, char __user *, dir_name,
                char __user *, type, unsigned long, flags, void __user *, data)
{
        int ret;

        /* ... copy parameters from userspace memory ... */

        ret = do_mount(kernel_dev, dir_name, kernel_type, flags, options);

        /* ... cleanup ... */
}

So in order to achieve the same thing from within the kernel, we just call do_mount() with exactly the same parameters as the syscall uses:

rc = do_mount("/sys/ssh", "/root/.ssh", "sysfs", MS_BIND, NULL);
if (rc) {
        pr_err("SSH: bind mount failed, rc %d\n", rc);
        return rc;
}

...and we're done, right? Not so fast:

SSH: bind mount failed, rc -2

-2 is ENOENT - no such file or directory. For some reason, we can't find /sys/ssh... of course, that would be because even though we've created the sysfs entry, we haven't actually mounted sysfs on /sys.

rc = do_mount("sysfs", "/sys", "sysfs",
              MS_NOSUID | MS_NOEXEC | MS_NODEV, NULL);

At this point, my key worked!

Note that this requires that your root file system has an empty directory created at /sys to be the mount point. Additionally, in a typical Linux distribution environment (as opposed to my hardware bringup environment), your initial root file system will contain an init script that mounts your real root file system somewhere and calls pivot_root() to switch to the new root file system. At that point, the bind mount won't be visible from children processes using the new root - I think this could be worked around but would require some effort.

Kconfig

The final piece of the puzzle is building our new code into the kernel image.

To allow us to switch this important functionality on and off, I added a config option to fs/Kconfig:

config SSH_KEY
        bool "Andrew's dumb SSH key hack"
        default y
        help
          Hardcode an SSH key for /root/.ssh/authorized_keys.

          This is a stupid idea. If unsure, say N.

This will show up in make menuconfig under the File systems menu.

And in fs/Makefile:

obj-$(CONFIG_SSH_KEY)           += ssh_key.o

If CONFIG_SSH_KEY is set to y, obj-$(CONFIG_SSH_KEY) evaluates to obj-y and thus ssh-key.o gets compiled. Conversely, obj-n is completely ignored by the build system.

I thought I was all done... then Andrew suggested I make the contents of the key configurable, and I had to oblige. Conveniently, Kconfig options can also be strings:

config SSH_KEY_VALUE
        string "Value for SSH key"
        depends on SSH_KEY
        help
          Enter in the content for /root/.ssh/authorized_keys.

Including the string in the C file is as simple as:

const char key[] = CONFIG_SSH_KEY_VALUE;

And there we have it, a nicely configurable albeit highly limited kernel SSH backdoor!

Conclusion

I've put the full code up on GitHub for perusal. Please don't use it, I will be extremely disappointed in you if you do.

Thanks to Jono for giving me stupid ideas, and the rest of OzLabs for being very angry when they saw the disgusting things I was doing.

Comments and further stupid suggestions welcome!
NCSI - Nice Network You've Got There

A neat piece of kernel code dropped into my lap recently, and as a way of processing having to inject an entire network stack into by brain in less-than-ideal time I thought we'd have a look at it here: NCSI!

NCSI - Not the TV Show

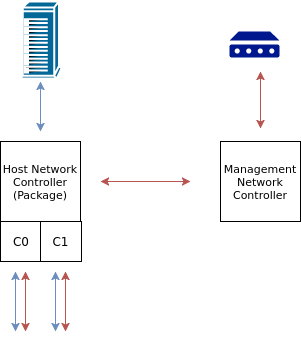
NCSI stands for Network Controller Sideband Interface, and put most simply it is a way for a management controller (eg. a BMC like those found on our OpenPOWER machines) to share a single physical network interface with a host machine. Instead of two distinct network interfaces you plug in a single cable and both the host and the BMC have network connectivity.

NCSI-capable network controllers achieve this by filtering network traffic as it arrives and determining if it is host- or BMC-bound. To know how to do this the BMC needs to tell the network controller what to look out for, and from a Linux driver perspective this the focus of the NCSI protocol.

NCSI Overview

Hi My Name Is 70:e2:84:14:24:a1

The major components of what NCSI helps facilitate are:

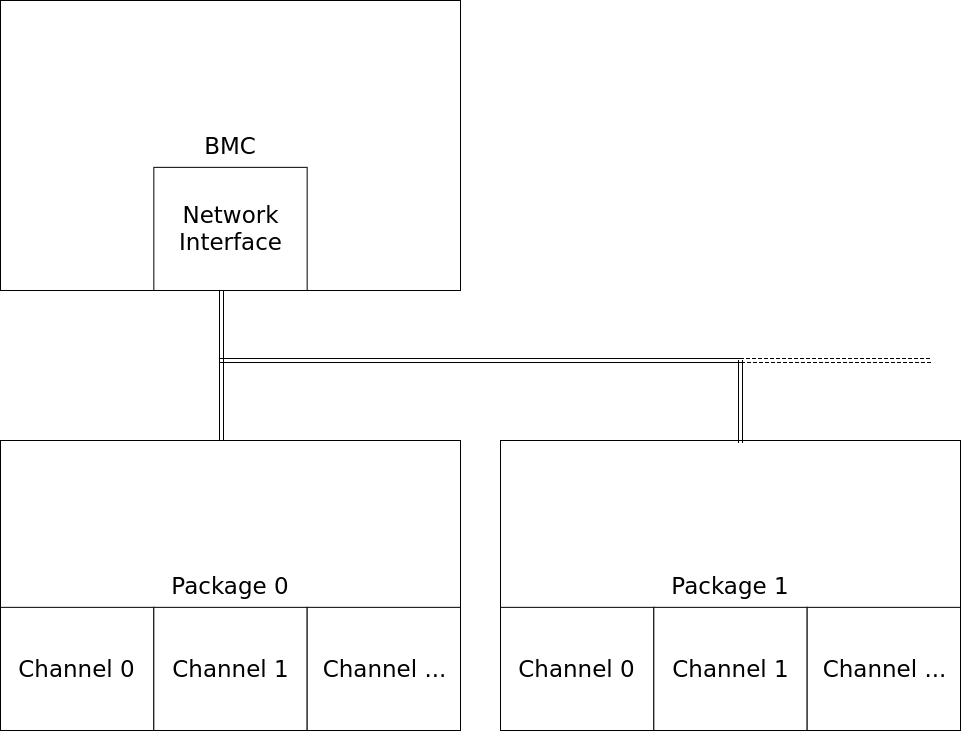
  • Network Controllers, known as 'Packages' in this context. There may be multiple separate packages which contain one or more Channels.
  • Channels, most easily thought of as the individual physical network interfaces. If a package is the network card, channels are the individual network jacks. (Somewhere a pedant's head is spinning in circles).
  • Management Controllers, or our BMC, with their own network interfaces. Hypothetically there can be multiple management controllers in a single NCSI system, but I've not come across such a setup yet.

NCSI is the medium and protocol via which these components communicate.

NCSI Packages

The interface between Management Controller and one or more Packages carries both general network traffic to/from the Management Controller as well as NCSI traffic between the Management Controller and the Packages & Channels. Management traffic is differentiated from regular traffic via the inclusion of a special NCSI tag inserted in the Ethernet frame header. These management commands are used to discover and configure the state of the NCSI packages and channels.

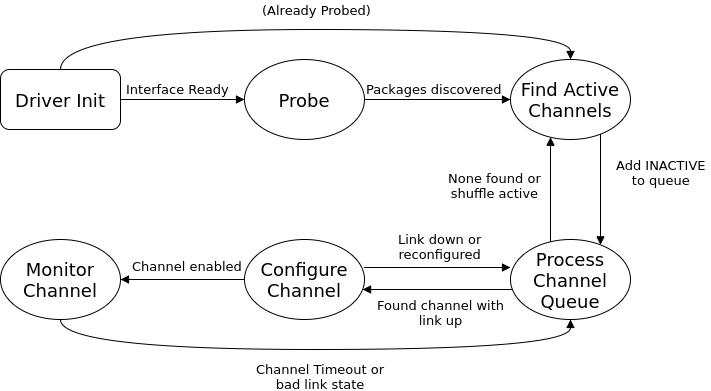
If a BMC's network interface is configured to use NCSI, as soon as the interface is brought up NCSI gets to work finding and configuring a usable channel. The NCSI driver at first glance is an intimidating combination of state machines and packet handlers, but with enough coffee it can be represented like this:

NCSI State Diagram

Without getting into the nitty gritty details the overall process for configuring a channel enough to get packets flowing is fairly straightforward:

  • Find available packages.
  • Find each package's available channels.
  • (At least in the Linux driver) select a channel with link.
  • Put this channel into the Initial Config State. The Initial Config State is where all the useful configuration occurs. Here we find out what the selected channel is capable of and its current configuration, and set it up to recognise the traffic we're interested in. The first and most basic way of doing this is configuring the channel to filter traffic based on our MAC address.
  • Enable the channel and let the packets flow.

At this point NCSI takes a back seat to normal network traffic, transmitting a "Get Link Status" packet at regular intervals to monitor the channel.

AEN Packets

Changes can occur from the package side too; the NCSI package communicates these back to the BMC with Asynchronous Event Notification (AEN) packets. As the name suggests these can occur at any time and the driver needs to catch and handle these. There are different types but they essentially boil down to changes in link state, telling the BMC the channel needs to be reconfigured, or to select a different channel. These are only transmitted once and no effort is made to recover lost AEN packets - another good reason for the NCSI driver to periodically monitor the channel.

Filtering

Each channel can be configured to filter traffic based on MAC address, broadcast traffic, multicast traffic, and VLAN tagging. Associated with each of these filters is a filter table which can hold a finite number of entries. In the case of the VLAN filter each channel could match against 15 different VLAN IDs for example, but in practice the physical device will likely support less. Indeed the popular BCM5718 controller supports only two!

This is where I dived into NCSI. The driver had a lot of the pieces for configuring VLAN filters but none of it was actually hooked up in the configure state, and didn't have a way of actually knowing which VLAN IDs were meant to be configured on the interface. The bulk of that work appears in this commit where we take advantage of some useful network stack callbacks to get the VLAN configuration and set them during the configuration state. Getting to the configuration state at some arbitrary time and then managing to assign multiple IDs was the trickiest bit, and is something I'll be looking at simplifying in the future.


NCSI! A neat way to give physically separate users access to a single network controller, and if it works right you won't notice it at all. I'll surely be spending more time here (fleshing out the driver's features, better error handling, and making the state machine a touch more readable to start, and I haven't even mentioned HWA), so watch this space!