Store Halfword Byte-Reverse Indexed

A Power Technical Blog

Installing Centos 7.2 on IBM Power System's S822LC for High Performance Computing (Minksy) with USB device

Introduction

If you are installing Linux on your IBM Power System's S822LC server then the instructions in this article will help you to start and run your system. These instructions are specific to installing CentOS 7 on an IBM Power System S822LC for High Performance Computing (Minsky), but also work for RHEL 7 - just swap CentOS for RHEL.

Prerequisites

Before you power on the system, ensure that you have the following items:

  • Ethernet cables;
  • USB storage device of 7G or greater;
  • An installed ethernet network with a DHCP server;
  • Access to the DHCP server's logs;
  • Power cords and outlet for your system;
  • PC or notebook that has IPMItool level 1.8.15 or greater; and
  • a VNC client.

Download CentOS ISO file from the Centos Mirror. Select the "Everything" ISO file.

Note: You must use the 1611 release (dated 2016-12-22) or later due to Linux Kernel support for the server hardware.

Step 1: Preparing to power on your system

Follow these steps to prepare your system:

  1. If your system belongs in a rack, install your system into that rack. For instructions, see IBM POWER8 Systems information.
  2. Connect an Ethernet cable to the left embedded Ethernet port next to the serial port on the back of your system and the other end to your network. This Ethernet port is used for the BMC/IPMI interface.
  3. Connect another Enternet cable to the right Ethernet port for network connection for the operating system.
  4. Connect the power cords to the system and plug them into the outlets.

At this point, your firmware is booting.

Step 2: Determining the BMC firmware IP address

To determine the IP address of the BMC, examine the latest DHCP server logs for the network connected to the server. The IP address will be requested approximately 2 minutes after being powered on.

It is possible to set the BMC to a static IP address by following the IBM documentation on IPMI.

Step 3: Connecting to the BMC firmware with IPMItool

After you have a network connection set up for your BMC firmware, you can connect using Intelligent Platform Management Interface (IPMI). IPMI is the default console to use when connecting to the Open Power Abstraction Layer (OPAL) firmware.

Use the default authentication for servers over IPMI is:

  • Default user: ADMIN
  • Default password: admin

To power on your server from a PC or notebook that is running Linux®, follow these steps:

Open a terminal program on your PC or notebook with Activate Serial-Over-Lan using IPMI. Use other steps here as needed.

For the following impitool commands, server_ip_address is the IP address of the BMC from Step 2, and ipmi_user and ipmi_password are the default user ID and password for IPMI.

Power On using IPMI

If your server is not powered on, run the following command to power the server on:

ipmitool -I lanplus -H server_ip_address -U ipmi_user -P ipmi_password chassis power on

Activate Serial-Over-Lan using IPMI

Activate your IPMI console by running this command:

ipmitool -I lanplus -H server_ip_address -U ipmi_user -P ipmi_password sol activate

After powering on your system, the Petitboot interface loads. If you do not interrupt the boot process by pressing any key within 10 seconds, Petitboot automatically boots the first option. At this point the IPMI console will be connected to the Operating Systems serial. If you get to this stage accidently you can deactivate and reboot as per the following two commands.

Deactivate Serial-Over-Lan using IPMI

If you need to power off or reboot your system, deactivate the console by running this command:

ipmitool -I lanplus -H server_ip_address -U user-name -P ipmi_password sol deactivate

Reboot using IPMI

If you need to reboot the system, run this command:

ipmitool -I lanplus -H server_ip_address -U user-name -P ipmi_password chassis power reset

Step 4: Creating a USB device and booting

At this point, your IPMI console should be contain a Petitboot bootloader menu as illustrated below and you are ready to install Centos 7 on your server.
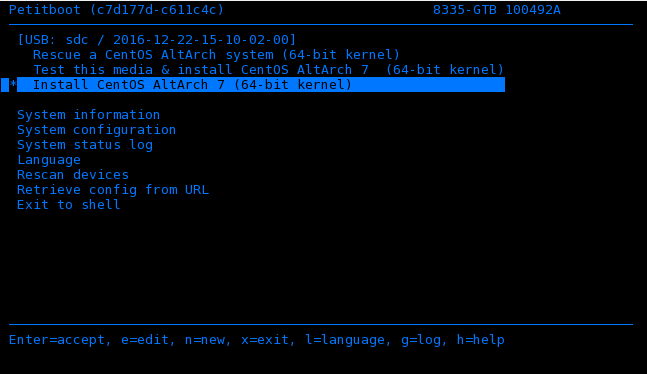
Petitboot menu over IPMI

Use one of the following USB devices:

  • USB attached DVD player with a single USB cable to stay under 1.0 Amps, or
  • 7 GB (or more) 2.0 (or later) USB flash drive.

Follow the following instructions:

  1. To create the bootable USB device, follow the instructions in the CentOS wiki Host to Set Up a USB to Install CentOS.
  2. Insert your bootable USB device into the front USB port. CentOS AltArch installer will automatically appear as a boot option on the Petitboot main screen. If the USB device does not appear select Rescan devices. If your device is not detected, you might have to try a different type.
  3. Arrow up to select the CentOS boot option. Press e (Edit) to open the Petitboot Option Editor window
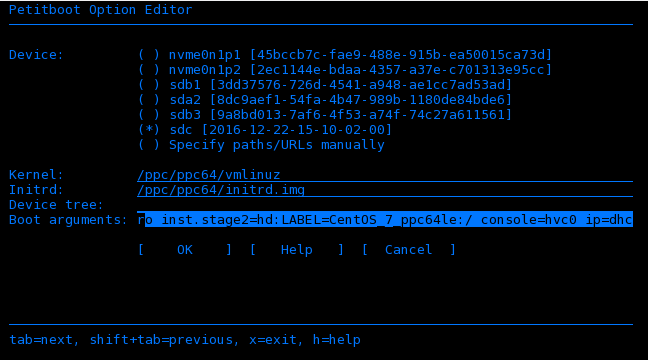
  4. Move the cursor to the Boot arguments section and to include the following information: ro inst.stage2=hd:LABEL=CentOS_7_ppc64le:/ console=hvc0 ip=dhcp (if using RHEL the LABEL will be similar to RHEL-7.3\x20Server.ppc64le:/)

Petitboot edited "Install CentOS AltArch 7 (64-bit kernel)

Notes about the boot arguments:

  • ip=dhcp to ensure network is started for VNC installation.
  • console hvc0 is needed as this is not the default.
  • inst.stage2 is needed as the boot process won't automatically find the stage2 install on the install disk.
  • append inst.proxy=URL where URL is the proxy URL if installing in a network that requires a proxy to connect externally.

You can find additional options at Anaconda Boot Options.

  1. Select OK to save your options and return to the Main menu
  2. On the Petitboot main screen, select the CentOS AltArch option and then press Enter.

Step 5: Complete your installation

After you select to boot the CentOS installer, the installer wizard walks you through the steps.

  1. If the CentOS installer was able to obtain a network address via DHCP, it will present an option to enable the VNC. If no option is presented check your network cables. VNC option
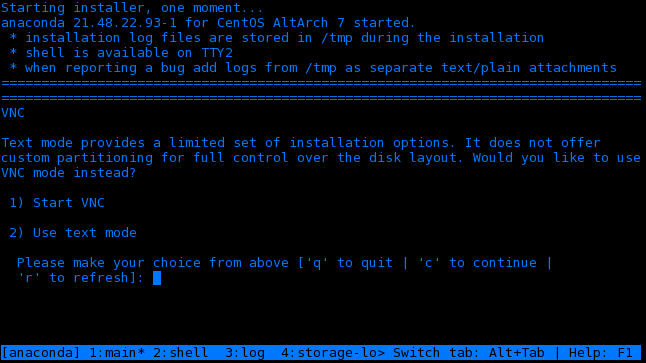
  2. Select the Start VNC option and it will provide an OS server IP adress. Note that this will be different to the BMC address previously optained. VNC option selected
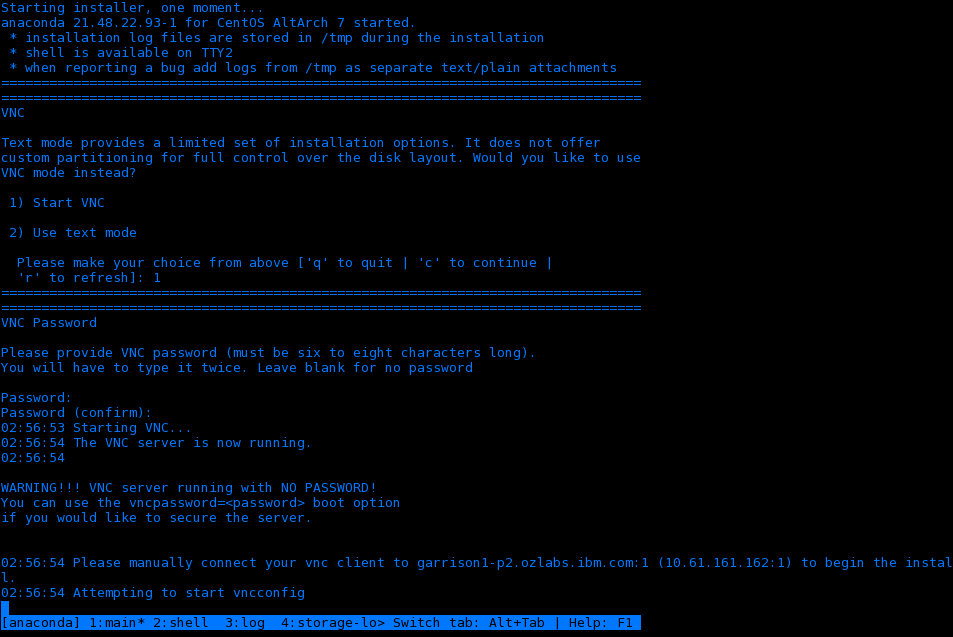
  3. Run a VNC client program on your PC or notebook and connect to the OS server IP address.
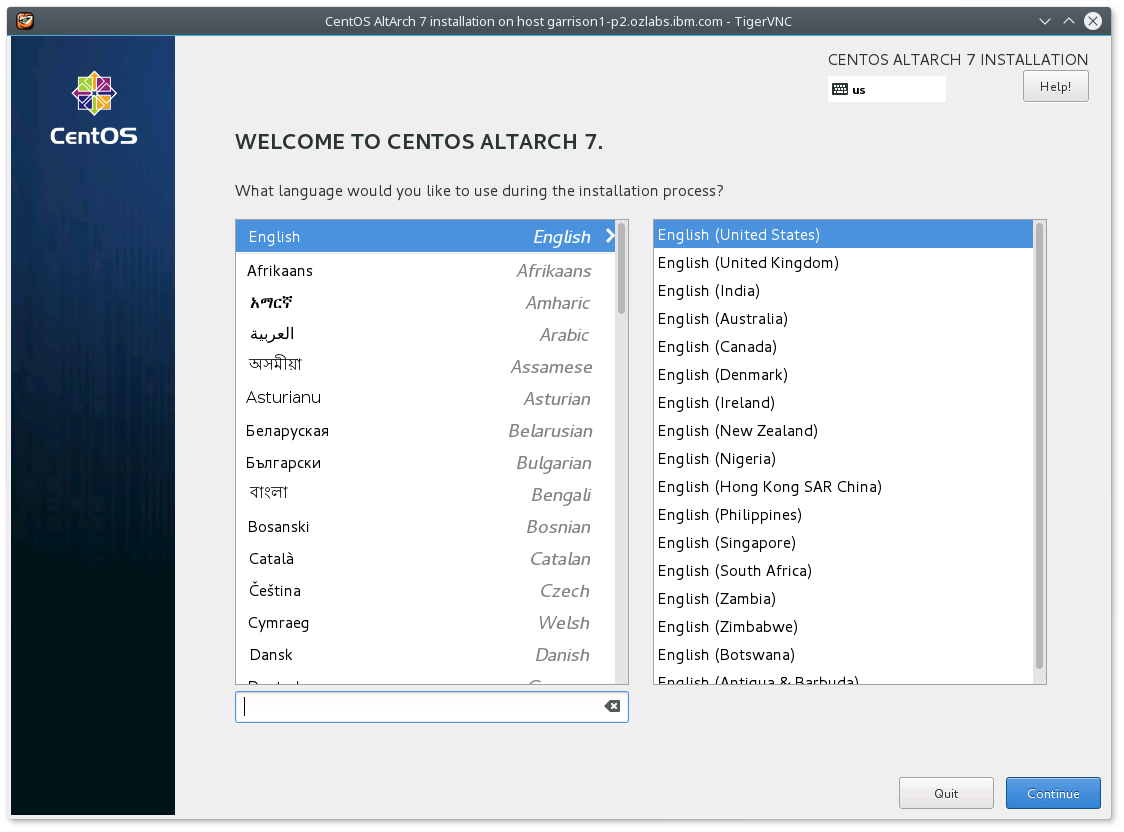
VNC of Installer

During the install over VNC, there are a couple of consoles active. To switch between them in the ipmitool terminal, press ctrl-b and then between 1-4 as indicated.

Using the VNC client program:

  1. Select "Install Destination"
  2. Select a device from "Local Standard Disks"
  3. Select "Full disk summary and boot device"
  4. Select the device again from "Selected Disks" with the Boot enabled
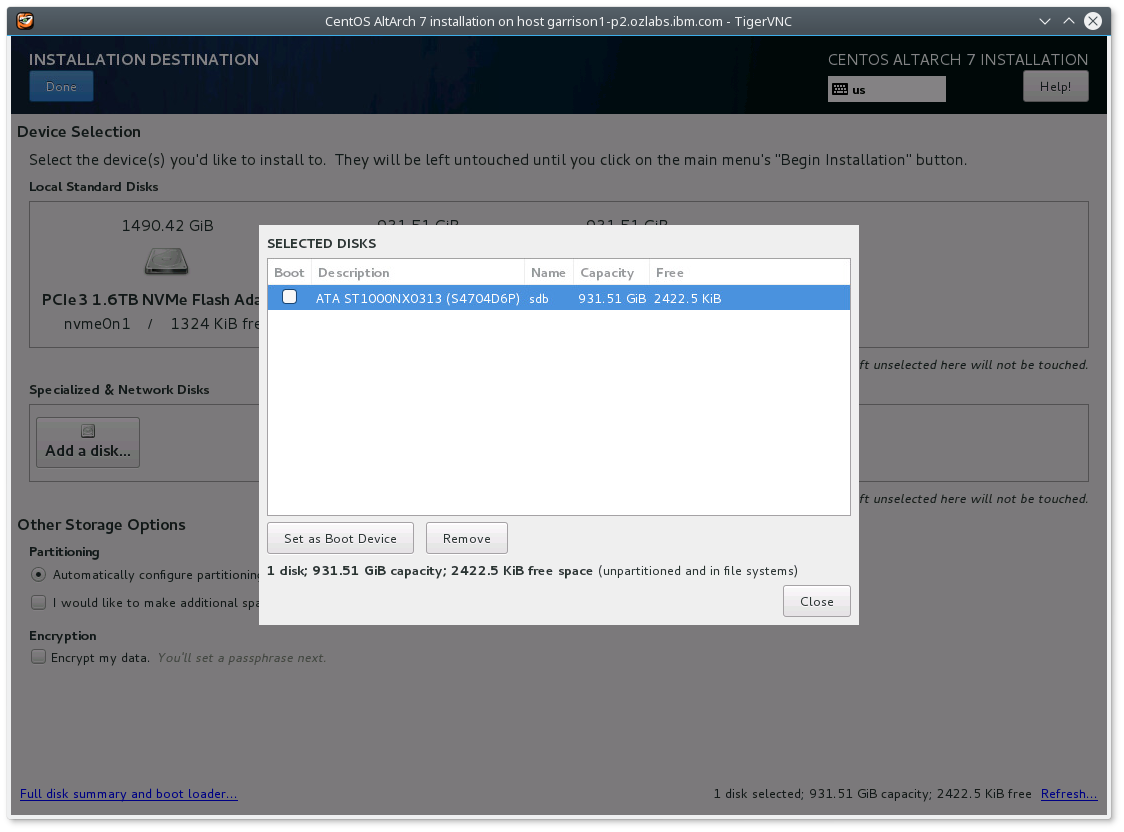
  5. Select "Do not install boot loader" from device. Disabling install of boot loader which results in Result after disabling boot loader install.
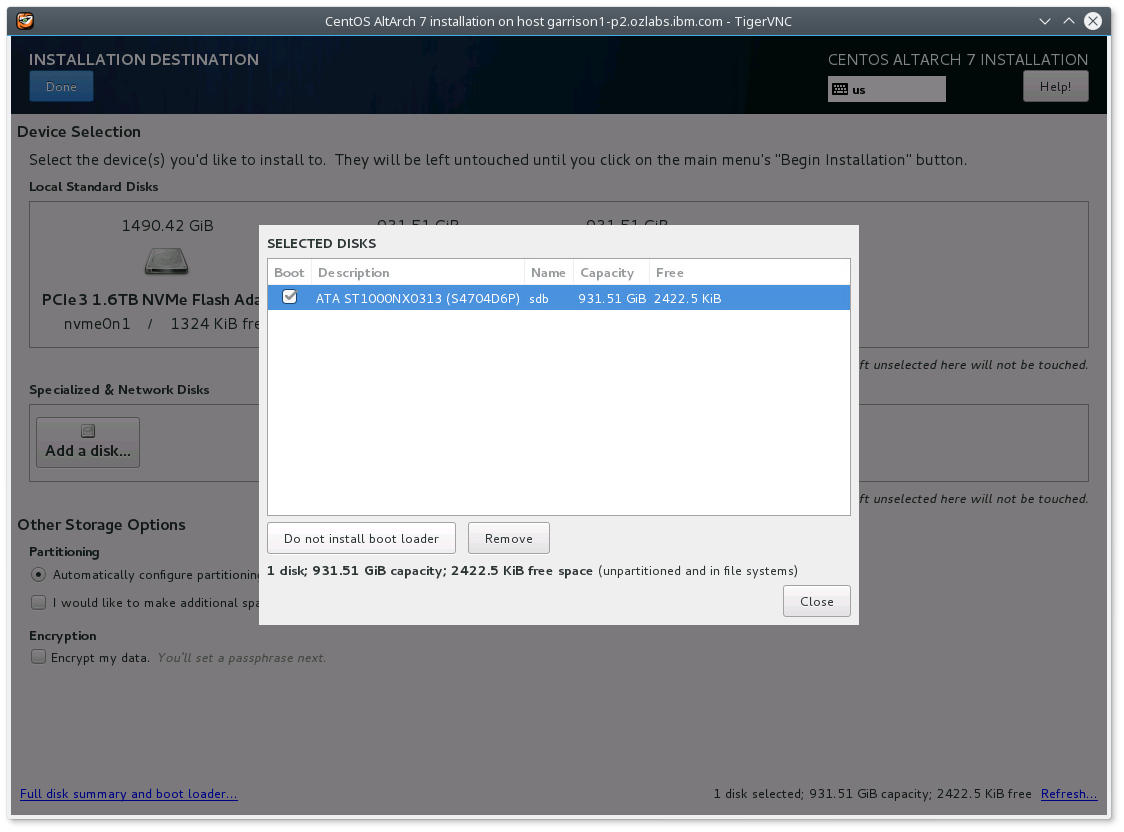
Without disabling boot loader, the installer complains about an invalid stage1 device. I suspect it needs a manual Prep partition of 10M to make the installer happy.

If you have a local Centos repository you can set this by selecting "Install Source" - the directories at this url should look like CentOS's Install Source for ppc64le.

Step 6: Before reboot and using the IPMI Serial-Over-LAN

Before reboot, generate the grub.cfg file as Petitboot uses this to generate its boot menu:

  1. Using the ipmitool's shell (ctrl-b 2):
  2. Enter the following commands to generate a grub.cfg file
chroot /mnt/sysimage
rm /etc/grub.d/30_os-prober
grub2-mkconfig -o /boot/grub2/grub.cfg
exit

/etc/grub.d/30_os-prober is removed as Petitboot probes the other devices anyway so including it would create lots of duplicate menu items.

The last step is to restart your system.

Note: While your system is restarting, remove the USB device.

After the system restarts, Petitboot displays the option to boot CentOS 7.2. Select this option and press Enter.

Conclusion

After you have booted CentOS, your server is ready to go! For more information, see the following resources:
Getting In Sync

Since at least v1.0.0 Petitboot has used device-mapper snapshots to avoid mounting block devices directly. Primarily this is so Petitboot can mount disks and potentially perform filesystem recovery without worrying about messing it up and corrupting a host's boot partition - all changes happen to the snapshot in memory without affecting the actual device.

This of course gets in the way if you actually do want to make changes to a block device. Petitboot will allow certain bootloader scripts to make changes to disks if configured (eg, grubenv updates), but if you manually make changes you would need to know the special sequence of dmsetup commands to merge the snapshots back to disk. This is particulary annoying if you're trying to copy logs to a USB device!

Depending on how recent a version of Petitboot you're running, there are two ways of making sure your changes persist:

Before v1.2.2

If you really need to save changes from within Petitboot, the most straightforward way is to disable snapshots. Drop to the shell and enter

nvram --update-config petitboot,snapshots?=false
reboot

Once you have rebooted you can remount the device as read-write and modify it as normal.

After v1.2.2

To make this easier while keeping the benefit of snapshots, v1.2.2 introduces a new user-event that will merge snapshots on demand. For example:

mount -o remount,rw /var/petitboot/mnt/dev/sda2
cp /var/log/messages /var/petitboot/mnt/dev/sda2/
pb-event sync@sda2

After calling pb-event sync@yourdevice, Petitboot will remount the device back to read-only and merge the current snapshot differences back to disk. You can also run pb-event sync@all to sync all existing snapshots if desired.

Get off my lawn: separating Docker workloads using cgroups

On my team, we do two different things in our Continuous Integration setup: build/functional tests, and performance tests. Build tests simply test whether a project builds, and, if the project provides a functional test suite, that the tests pass. We do a lot of MySQL/MariaDB testing this way. The other type of testing we do is performance tests: we build a project and then run a set of benchmarks against it. Python is a good example here.

Build tests want as much grunt as possible. Performance tests, on the other hand, want a stable, isolated environment. Initially, we set up Jenkins so that performance and build tests never ran at the same time. Builds would get the entire machine, and performance tests would never have to share with anyone.

This, while simple and effective, has some downsides. In POWER land, our machines are quite beefy. For example, one of the boxes I use - an S822L - has 4 sockets, each with 4 cores. At SMT-8 (an 8 way split of each core) that gives us 4 x 4 x 8 = 128 threads. It seems wasteful to lock this entire machine - all 128 threads - just so as to isolate a single-threaded test.1

So, can we partition our machine so that we can be running two different sorts of processes in a sufficiently isolated way?

What counts as 'sufficiently isolated'? Well, my performance tests are CPU bound, so I want CPU isolation. I also want memory, and in particular memory bandwith to be isolated. I don't particularly care about IO isolation as my tests aren't IO heavy. Lastly, I have a couple of tests that are very multithreaded, so I'd like to have enough of a machine for those test results to be interesting.

For CPU isolation we have CPU affinity. We can also do something similar with memory. On a POWER8 system, memory is connected to individual P8s, not to some central point. This is a 'Non-Uniform Memory Architecture' (NUMA) setup: the directly attached memory will be very fast for a processor to access, and memory attached to other processors will be slower to access. An accessible guide (with very helpful diagrams!) is the relevant RedBook (PDF), chapter 2.

We could achieve the isolation we want by dividing up CPUs and NUMA nodes between the competing workloads. Fortunately, all of the hardware NUMA information is plumbed nicely into Linux. Each P8 socket gets a corresponding NUMA node. lscpu will tell you what CPUs correspond to which NUMA nodes (although what it calls a CPU we would call a hardware thread). If you install numactl, you can use numactl -H to get even more details.

In our case, the relevant lscpu output is thus:

NUMA node0 CPU(s):     0-31
NUMA node1 CPU(s):     96-127
NUMA node16 CPU(s):    32-63
NUMA node17 CPU(s):    64-95

Now all we have to do is find some way to tell Linux to restrict a group of processes to a particular NUMA node and the corresponding CPUs. How? Enter control groups, or cgroups for short. Processes can be put into a cgroup, and then a cgroup controller can control the resouces allocated to the cgroup. Cgroups are hierarchical, and there are controllers for a number of different ways you could control a group of processes. Most helpfully for us, there's one called cpuset, which can control CPU affinity, and restrict memory allocation to a NUMA node.

We then just have to get the processes into the relevant cgroup. Fortunately, Docker is incredibly helpful for this!2 Docker containers are put in the docker cgroup. Each container gets it's own cgroup under the docker cgroup, and fortunately Docker deals well with the somewhat broken state of cpuset inheritance.3 So it suffices to create a cpuset cgroup for docker, and allocate some resources to it, and Docker will do the rest. Here we'll allocate the last 3 sockets and NUMA nodes to Docker containers:

cgcreate -g cpuset:docker
echo 32-127 > /sys/fs/cgroup/cpuset/docker/cpuset.cpus
echo 1,16-17 > /sys/fs/cgroup/cpuset/docker/cpuset.mems
echo 1 > /sys/fs/cgroup/cpuset/docker/cpuset.mem_hardwall

mem_hardwall prevents memory allocations under docker from spilling over into the one remaining NUMA node.

So, does this work? I created a container with sysbench and then ran the following:

root@0d3f339d4181:/# sysbench --test=cpu --num-threads=128 --max-requests=10000000 run

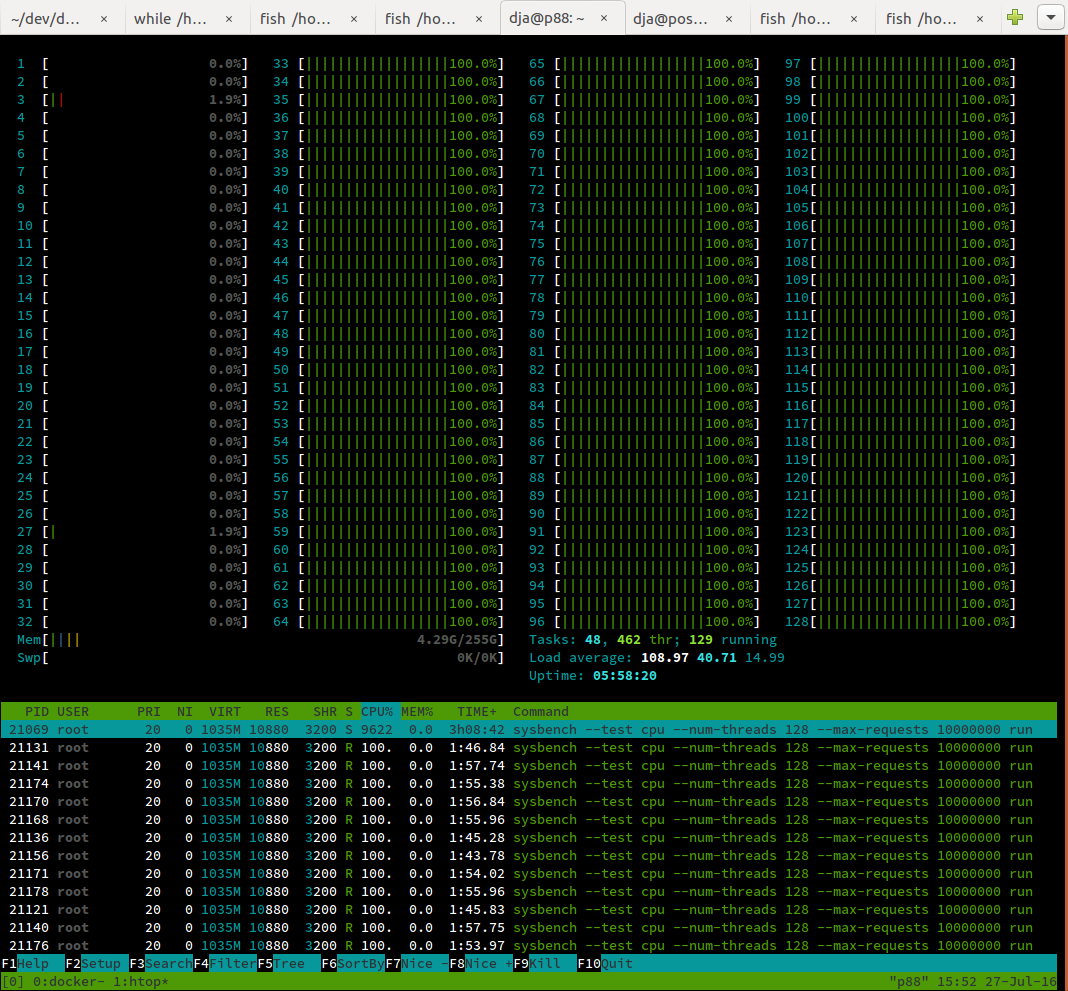
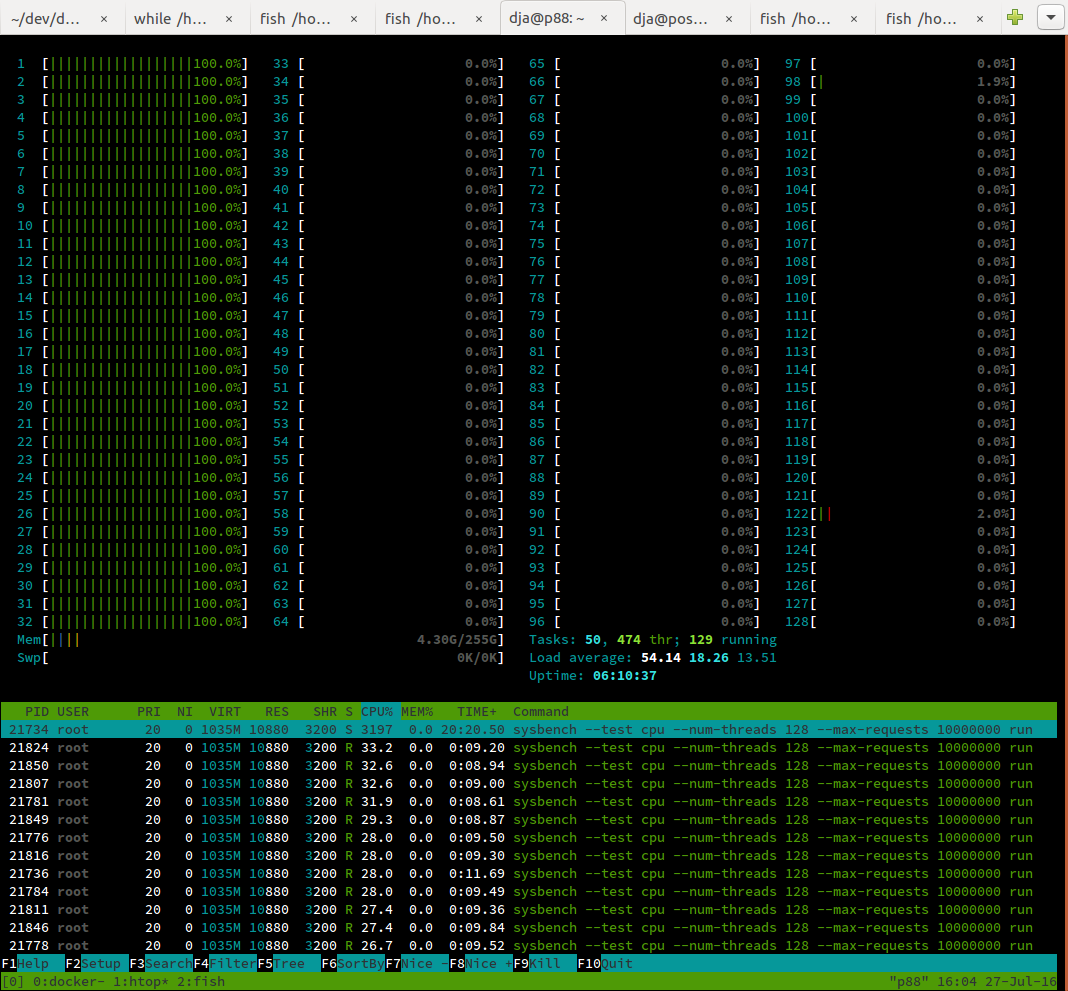
Now I've asked for 128 threads, but the cgroup only has CPUs/hwthreads 32-127 allocated. So If I run htop, I shouldn't see any load on CPUs 0-31. What do I actually see?

htop screenshot, showing load only on CPUs 32-127

It works! Now, we create a cgroup for performance tests using the first socket and NUMA node:

cgcreate -g cpuset:perf-cgroup
echo 0-31 > /sys/fs/cgroup/cpuset/perf-cgroup/cpuset.cpus
echo 0 > /sys/fs/cgroup/cpuset/perf-cgroup/cpuset.mems
echo 1 > /sys/fs/cgroup/cpuset/perf-cgroup/cpuset.mem_hardwall

Docker conveniently lets us put new containers under a different cgroup, which means we can simply do:

dja@p88 ~> docker run -it --rm --cgroup-parent=/perf-cgroup/ ppc64le/ubuntu bash
root@b037049f94de:/# # ... install sysbench
root@b037049f94de:/# sysbench --test=cpu --num-threads=128 --max-requests=10000000 run

And the result?

htop screenshot, showing load only on CPUs 0-31

It works! My benchmark results also suggest this is sufficient isolation, and the rest of the team is happy to have more build resources to play with.

There are some boring loose ends to tie up: if a build job does anything outside of docker (like clone a git repo), that doesn't come under the docker cgroup, and we have to interact with systemd. Because systemd doesn't know about cpuset, this is quite fiddly. We also want this in a systemd unit so it runs on start up, and we want some code to tear it down. But I'll spare you the gory details.

In summary, cgroups are surprisingly powerful and simple to work with, especially in conjunction with Docker and NUMA on Power!


  1. It gets worse! Before the performance test starts, all the running build jobs must drain. If we have 8 Jenkins executors running on the box, and a performance test job is the next in the queue, we have to wait for 8 running jobs to clear. If they all started at different times and have different runtimes, we will inevitably spend a fair chunk of time with the machine at less than full utilisation while we're waiting. 

  2. At least, on Ubuntu 16.04. I haven't tested if this is true anywhere else. 

  3. I hear this is getting better. It is also why systemd hasn't done cpuset inheritance yet. 

Where to Get a POWER8 Development VM

POWER8 sounds great, but where the heck can I get a Power VM so I can test my code?

This is a common question we get at OzLabs from other open source developers looking to port their software to the Power Architecture. Unfortunately, most developers don't have one of our amazing servers just sitting around under their desk.

Thankfully, there's a few IBM partners who offer free VMs for development use. If you're in need of a development VM, check out:

So, next time you wonder how you can test your project on POWER8, request a VM and get to it!

Optical Action at a Distance

Generally when someone wants to install a Linux distro they start with an ISO file. Now we could burn that to a DVD, walk into the server room, and put it in our machine, but that's a pain. Instead let's look at how to do this over the network with Petitboot!

At the moment Petitboot won't be able to handle an ISO file unless it's mounted in an expected place (eg. as a mounted DVD), so we need to unpack it somewhere. Choose somewhere to host the result and unpack the ISO via whatever method you prefer. (For example bsdtar -xf /path/to/image.iso).

You'll get a bunch of files but for our purposes we only care about a few; the kernel, the initrd, and the bootloader configuration file. Using the Ubuntu 16.04 ppc64el ISO as an example, these are:

./install/vmlinux
./install/initrd.gz.
./boot/grub/grub.cfg

In grub.cfg we can see that the boot arguments are actually quite simple:

set timeout=-1

menuentry "Install" {
    linux   /install/vmlinux tasks=standard pkgsel/language-pack-patterns= pkgsel/install-language-support=false --- quiet
    initrd  /install/initrd.gz
}

menuentry "Rescue mode" {
    linux   /install/vmlinux rescue/enable=true --- quiet
    initrd  /install/initrd.gz
}

So all we need to do is create a PXE config file that points Petitboot towards the correct files.

We're going to create a PXE config file which you could serve from your DHCP server, but that does not mean we need to use PXE - if you just want a quick install you only need make these files accessible to Petitboot, and then we can use the 'Retrieve config from URL' option to download the files.

Create a petitboot.conf file somewhere accessible that contains (for Ubuntu):

label Install Ubuntu 16.04 Xenial Xerus
    kernel http://myaccesibleserver/path/to/vmlinux
    initrd http://myaccesibleserver/path/to/initrd.gz
    append tasks=standard pkgsel/language-pack-patterns= pkgsel/install-language-support=false --- quiet

Then in Petitboot, select 'Retrieve config from URL' and enter http://myaccesibleserver/path/to/petitboot.conf. In the main menu your new option should appear - select it and away you go!